
Key Features
- Add a new cemetery with contact and address information
- Define a custom tier structure with up to five tiers
- Choose from multiple naming patterns per tier
- Automatically generate all grave IDs when the cemetery is created
- View cemetery details, map, tier structure, and grave statuses after creation
How to Add a New Cemetery
- Go to Cemetery → Cemetery Management
- Click Add New Cemetery
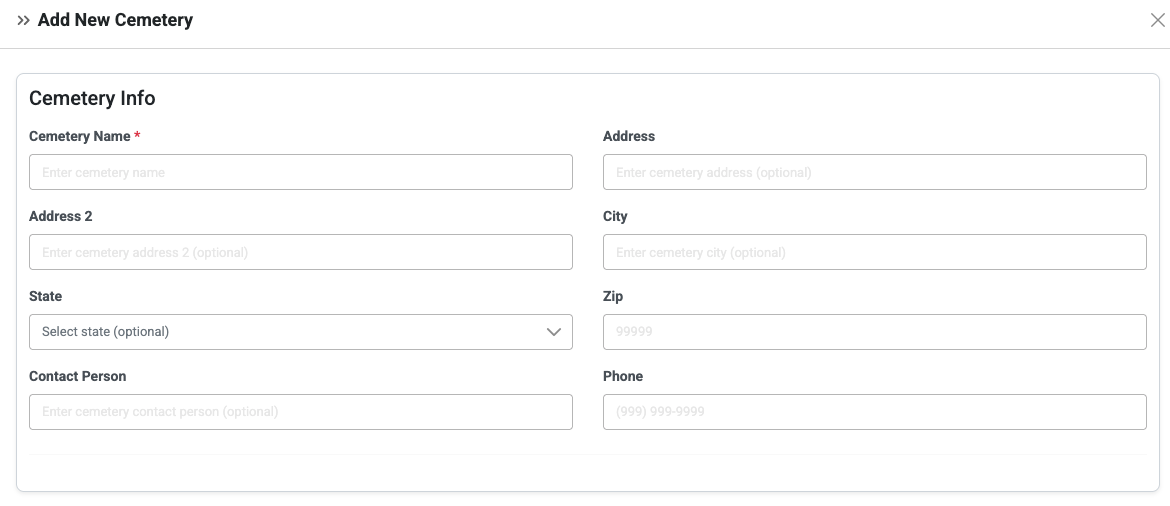
Step 1: Enter Cemetery Information
Fill in the cemetery details. Only the Cemetery Name is required; all other fields are optional.
- Cemetery Name (required)
- Address
- Address Line 2
- City
- State
- Zip
- Contact Person
- Phone Number
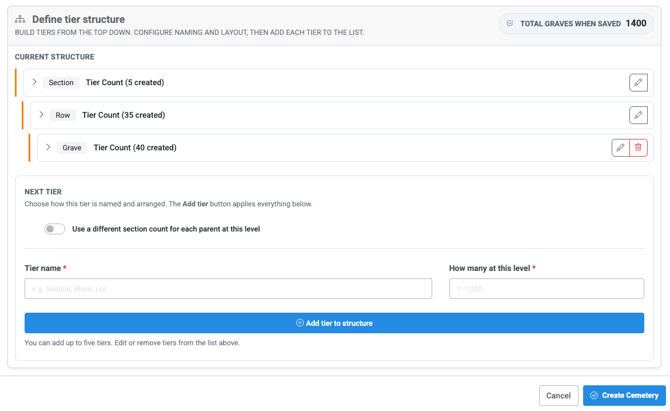
Step 2: Define the Tier Structure
The tier structure defines the layout and naming of the cemetery. This determines how grave IDs are generated. A typical pattern is: Section → Block → Lot → Plot.
You can add up to five tiers. Each tier you add must be saved by clicking Add Tier to Structure before moving on to the next tier.

For each tier, enter:
- Tier Name (required)
- How Many at This Level — the total count of items at this tier
- Naming Pattern — choose one of the following:
- Numeric
- Alphabetical
- Alphanumeric
- Custom Names
Naming Pattern Options:
Numeric
- Automatically starts at 1
- Custom Starting Value: Set a different starting number (e.g., 5, 10, 25) and count up from there
- Zero Padded Numbers: Adds a leading zero to numbers (e.g., 01, 02, 03, 04)
Alphabetical
- Automatically starts at A
- Custom Starting Value: Set a different starting letter
Alphanumeric
- Automatically starts at 1A
- Custom Starting Value: Set a different starting value
Custom Names
- Manually type in the specific names to use at this tier level
Tiers 2 Through 5: Different Count per Parent
For tiers 2 through 5, you have the option to assign a different count to each parent item at the tier above. This allows, for example, each section to contain a different number of blocks.
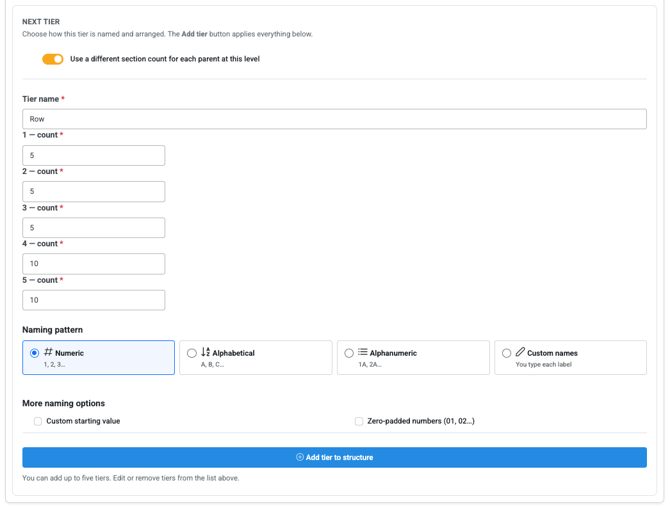
Note: Every time you finish configuring a tier, click Add Tier to Structure before setting up the next one.
Total Graves Preview
At the top of the Define Tier Structure area, a Total Graves When Saved count is displayed. This shows the total number of graves that will be generated based on your tier configuration before you finalize the cemetery.
Step 3: Create the Cemetery
- Review the Total Graves When Saved count to confirm the structure is correct
- Click Create Cemetery to finalize
- All grave IDs will be automatically generated for the cemetery and will show in Grave Management
Note: Click Cancel at any time before creating to discard all changes.
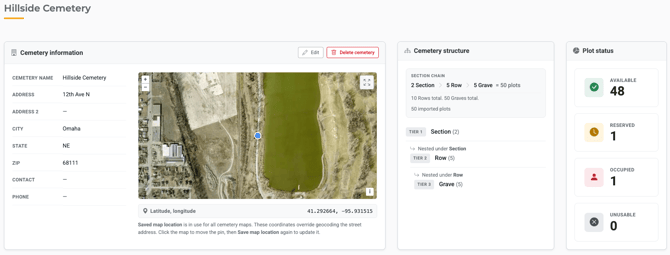
After Creating the Cemetery
Once the cemetery is created, you can click on the cemetery name to view:
- Address information
- A map corresponding to the cemetery location
- The tier structure that was defined
- Grave statuses for the cemetery
Helpful Tips
- The only required field to create a cemetery is the Cemetery Name — you can add address and contact details later
- Plan your tier structure before building it; a typical layout is Section → Block → Lot → Plot
- Use zero padded numbers if you want grave IDs to sort consistently (e.g., 01, 02 instead of 1, 2)
- Use Custom Names when a tier uses non-standard identifiers specific to your cemetery
- Use the Total Graves When Saved count to verify your tier structure before clicking Create Cemetery
- Click Add Tier to Structure after every tier — tiers that are not saved will not be included
Troubleshooting
Issue: The cemetery was created but is missing tiers or has fewer graves than expected.
Fix: Each tier must be saved by clicking Add Tier to Structure before creating the cemetery. If a tier was not added, the cemetery will need to be recreated.
Issue: The grave IDs are not in the expected format.
Fix: Review the naming pattern and custom starting value selected for each tier. These settings determine how IDs are generated.
Fix: When setting up tiers 2 through 5, use the option to add a different count for each parent item instead of a single count for the whole tier.