
Overview
Action codes are what clerks pick in Record Action on a case, such as a continuance, a warrant, or a failure to appear. Each action code can charge an action fee and print a document. This article covers three Court Settings tabs, in the order you set them up:
- Document Templates: notices, warrants, and orders, built from your case data.
- Action Codes: what each action does, and which documents and fees go with it.
- Docket Settings: what prints on the judge's and clerk's dockets.
Before you start
- Set up your court finances first, including action fees. See How to set up court finances: GL distributions, fees, payment order, and offenses.
- Have a copy of each notice or form your court sends today, so you can match its layout.
Step 1: Set up document templates
- Go to Court > Settings > Document Templates. Each template has three icons: copy, edit, and delete.
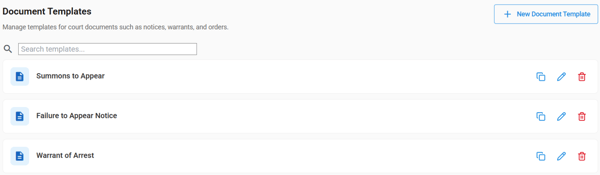
- To start a new template, click New Document Template, enter the Document Name, and click Submit. To start from an existing template, click its copy icon instead.
- In the template editor, drag components from the Component Library on the right onto the page:
- Layout: Large Title Text, Text Block, Card, Horizontal Line, and Signature Line.
- Case data: fields that fill in from the case when the document prints, such as Ticket Number, Case Number, Court Date, Courtroom, Judge Name, Violation Description, Defendant name and address, Attorney name, and Warrant Issued Date.
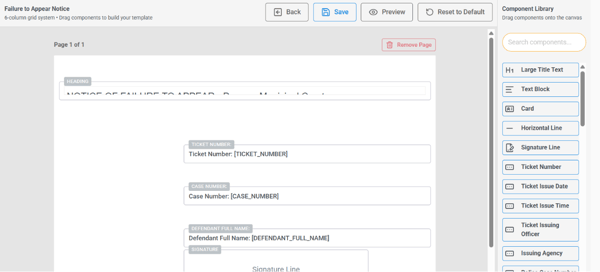
- Click Preview to see the document filled in with sample data. You can download the preview as a PDF.
- Click Save. Use Back to return to the list.
Step 2: Set up action codes
- Go to the Action Codes tab. The list shows each code's status, how many documents it prints, and its total action fees.
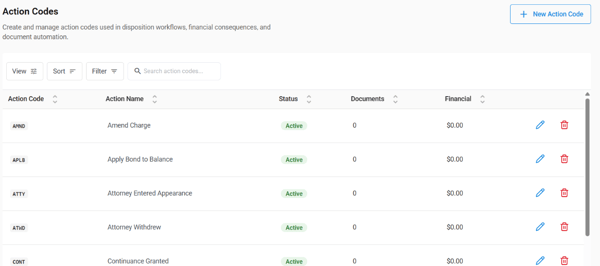
- Click New Action Code, or the pencil icon to edit one.
- Under Basic Configuration, enter the Action Code (up to 4 letters or numbers) and the Action Name. Leave Status set to Active.
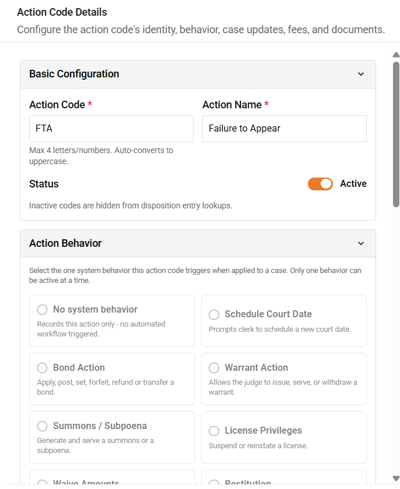
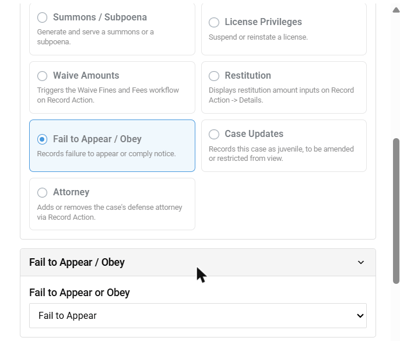
- Under Action Behavior, pick the one thing this action does when a clerk records it:
- No system behavior: records the action only, like a note.
- Schedule Court Date: asks the clerk to schedule a new court date.
- Bond Action: sets, posts, applies, refunds, forfeits, or transfers a bond.
- Warrant Action: issues, serves, or withdraws a warrant.
- Summons / Subpoena: creates and serves a summons or subpoena.
- License Privileges: suspends or reinstates a license.
- Waive Amounts: opens the waive fines and fees steps.
- Restitution: asks for restitution amounts.
- Fail to Appear / Obey: records a failure to appear or to comply. Pick which one in the Fail to Appear / Obey section that appears.
- Case Updates: marks the case as juvenile, to be amended, or restricted from view.
- Attorney: adds or removes the defense attorney on the case.
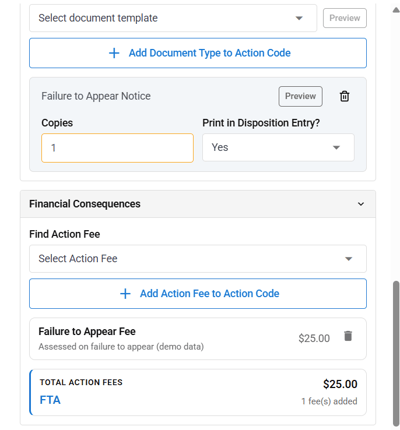
- Under Documents, pick a template and click Add Document Type to Action Code. For each document, set the number of Copies and whether to Print in Disposition Entry.
- Under Financial Consequences, pick an action fee and click Add Action Fee to Action Code. Total Action Fees shows what recording this action adds to the case.
- Click Save Changes.
For example, the FTA action code uses the Fail to Appear behavior, prints one Failure to Appear Notice, and adds the $25 Failure to Appear Fee.
Step 3: Set up the dockets
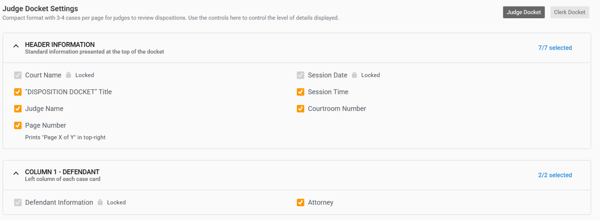
Court has two dockets. Click Judge Docket or Clerk Docket at the top right of the tab to switch between them.
- Judge Docket: compact, 3 to 4 cases per page, for the judge to review dispositions.
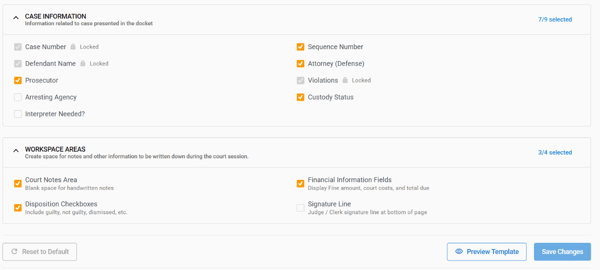
- Clerk Docket: detailed, one case per page, with space for notes.
- Go to the Docket Settings tab.
- Tick the details you want printed in each section. Items marked Locked always print.
- Judge Docket: the header, the defendant and attorney, violations and a fines box, prior appearances from the Case Timeline, the case header bar with disposition checkboxes, a notes area, and statute or ordinance references.
- Clerk Docket: the header, case information (such as prosecutor, arresting agency, custody status, and interpreter needed), and workspace areas (court notes, financial information, disposition checkboxes, and a signature line).
- Click Preview Template to check the layout.
- Click Save Changes. To start over, click Reset to Default.
What you'll see
- Your active action codes in the Record Action lists on a case.
- When a clerk records an action, its action fees are added to the case balance and its documents are ready to print.
- Your docket choices on the next docket you print. Dockets already printed don't change.
Good to know
- An action code has only one behavior. If an action needs two, such as a warrant and a fee, use the Warrant Action behavior and add the fee under Financial Consequences.
- Setting an action code to inactive hides it from Record Action, so clerks can't pick it.
- Action fees come from the Action Fees section of the Financials tab. Add or change the fee there, then add it to the action code.
- Template preview uses sample data. Record the action on a test case to see a document with real case data.
See also
- How to set up court finances: GL distributions, fees, payment order, and offenses
- How to set, post, apply, refund, or forfeit a bond on a court case
- How to take a payment on a court case