
Overview
Before your court takes its first payment, set up where the money goes and what each offense costs. This article covers four Court Settings tabs, in the order you set them up:
- Financials & GL Codes: GL distributions, which say which bank and general ledger accounts each kind of payment posts to.
- Financials: court costs, offense fees, and action fees, each with its amount and GL distribution.
- Payment Distribution: the order a payment pays off fines, court costs, and fees.
- Offense Library: each offense code with its fine, court cost, and offense fees.
Each step uses what the step before it set up. Fees need a GL distribution, and offense codes need the fine's GL distribution plus the court cost and offense fees.
Before you start
- Set up the Court Profile first. See How to set up your court: profile, judges, agencies, officers, and attorneys.
- Your bank accounts and general ledger accounts must already be in Finance Hub. Court picks from them.
- Have your fee schedule ready: each fine, court cost, and fee amount, and the date it takes effect.
Step 1: Set up GL distributions
A GL distribution ties one kind of court money to a bank and to a debit and credit account. For example, "Court Fines - General Fund" debits city checking and credits court fines revenue.
- Go to Court > Settings > Financials & GL Codes. Distributions are grouped by event type, such as Receive Payment: Fine.
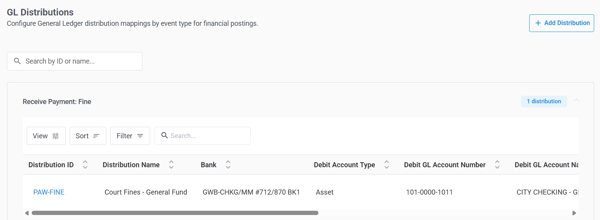
- Click Add Distribution.
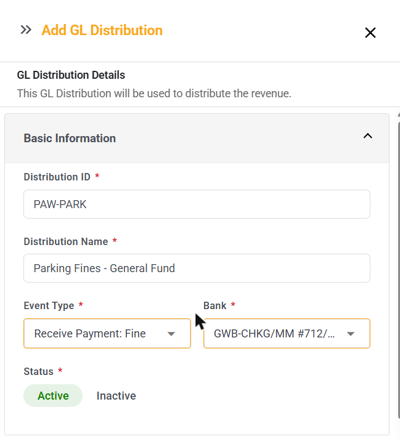
- Under Basic Information, enter:
- Distribution ID: a short code you'll pick from later, for example PAW-FINE.
- Distribution Name, for example Court Fines - General Fund.
- Event Type: Receive Payment: Fine, Court Cost, Offense Fee, Action Fee, or Restitution. Use Custom only for a setup that doesn't fit these.
- Bank: the bank account the money is deposited to.
- Leave Status set to Active.
- Under Debit Account and Credit Account, pick the GL Account Number for each. The account type is set by the event type, and the account name fills in by itself.
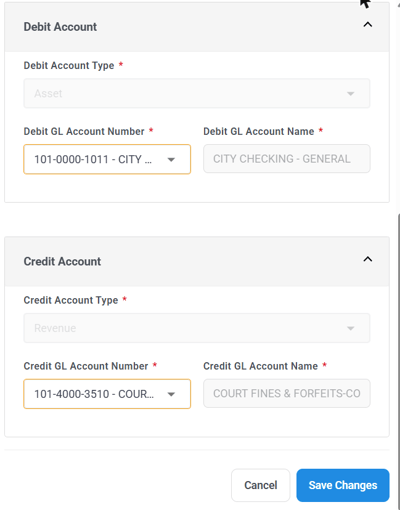
- Click Save Changes.
Repeat for each event type your court uses. If you take bonds, also set up distributions for bond receipts, bonds applied, and bond forfeitures.
Not sure which accounts to use? Click Event Types at the top right of the tab. It explains each event type and which account types it allows:
| Event type | Debit | Credit |
|---|---|---|
| Receive Payment: Fine or Court Cost | Asset (cash) | Revenue |
| Receive Payment: Offense Fee or Action Fee | Asset (cash) | Revenue if the court keeps it, Liability if it's collected for someone else |
| Receive Payment: Restitution | Asset (cash) | Liability (owed to the victim) |
| Bond Receipt | Asset (cash) | Liability or Revenue |
| Bond Applied | Liability or Revenue | Asset |
| Bond Forfeiture | Liability or Revenue | Revenue |
Step 2: Set up court costs and fees
- Go to the Financials tab. Fees are listed in three sections: Court Costs, Offense Fees, and Action Fees.
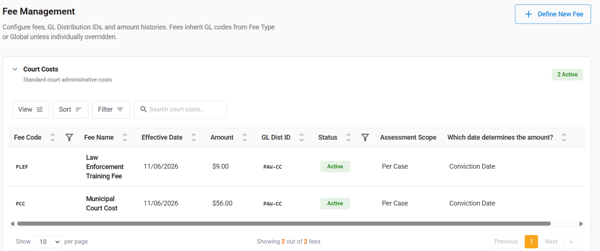
- Click Define New Fee.
- Under Basic Information, enter:
- Fee Type: Court Cost, Offense Fee, or Action Fee. This decides which section the fee appears in.
- Court Cost: charged on the case, for example the municipal court cost.
- Offense Fee: added to specific offense codes in Step 4.
- Action Fee: charged when a clerk records a court action, such as a warrant or a failure to appear.
- Which date determines the amount?: Offense Date or Conviction Date. The system uses this date to pick the amount that was in effect.
- Assessment Scope: Per Case charges the fee at most once per case. Per Offense charges it for each offense on the case.
- Fee Code and Fee Name, plus an optional Description.
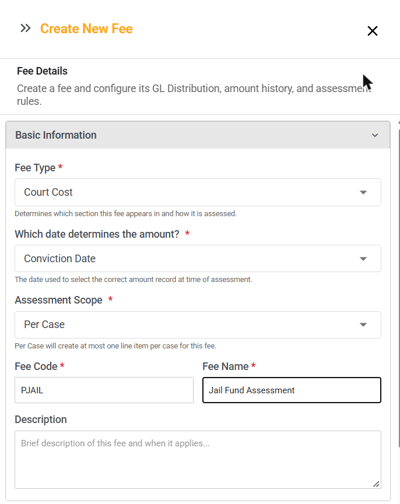
- Fee Type: Court Cost, Offense Fee, or Action Fee. This decides which section the fee appears in.
- Under Amount History, enter the Effective Date and Amount. When the amount changes later, click Add Amount Record and add the new amount with its own effective date. Each effective date must be different.
- Under GL Distribution, pick the distribution this fee posts to.
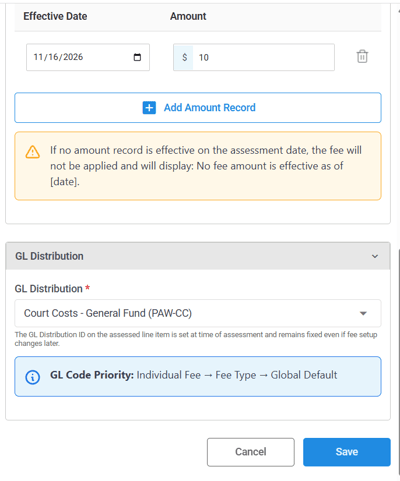
- Click Save.
To change a fee later, use the menu at the end of its row: Edit, Deactivate, Delete, or Version History.
Step 3: Set the payment order
When a payment doesn't cover the whole balance, the payment order decides what gets paid first.
- Go to the Payment Distribution tab.
- Under Balance Due Payments Order, drag the tiers into the order you want: Fines, Court Costs, Offense Fees, and Action Fees. This order is used when a clerk takes a Pay Balance Due payment.
- Under Apply Bond Order, set the order used when a bond is applied to the balance. It can be different from the payment order.
- Click Save.
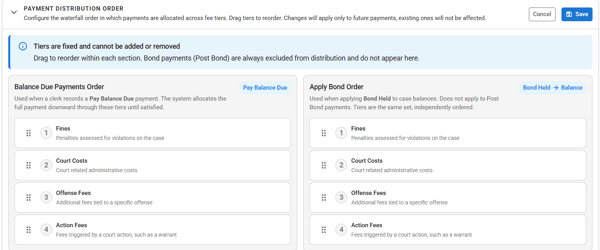
Step 4: Add offense codes
- Go to the Offense Library tab and click New Offense Code.
- Under Offense Description, enter the Offense Code, pick the Category Name, and enter the Offense Name (up to 100 characters). Sentence Guidelines is optional, up to 60 characters.
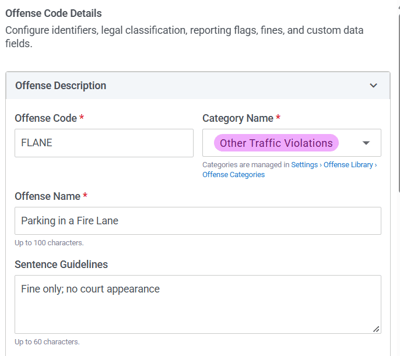
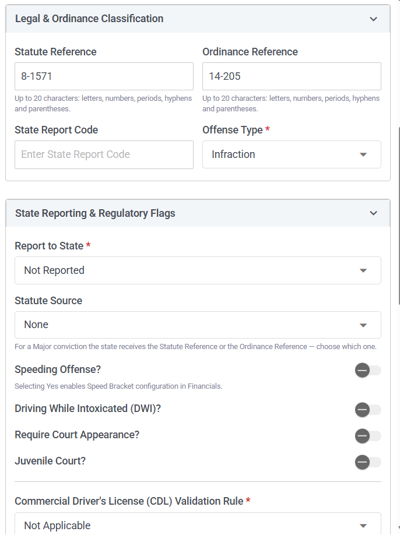
- Under Legal & Ordinance Classification, enter the Statute Reference and Ordinance Reference if they apply, and the State Report Code. Pick the Offense Type: Infraction, Misdemeanor, or Felony.
- Under State Reporting & Regulatory Flags:
- Report to State: Not Reported, Major Convictions, Minor Convictions, or Suspension/Reinstatement.
- Statute Source: for a major conviction, whether the state gets the statute or the ordinance reference.
- Turn on Speeding Offense?, Driving While Intoxicated (DWI)?, Require Court Appearance?, or Juvenile Court? if they apply.
- Commercial Driver's License (CDL) Validation Rule: Not Applicable, Defendant must have a CDL, or Defendant must not have a CDL.
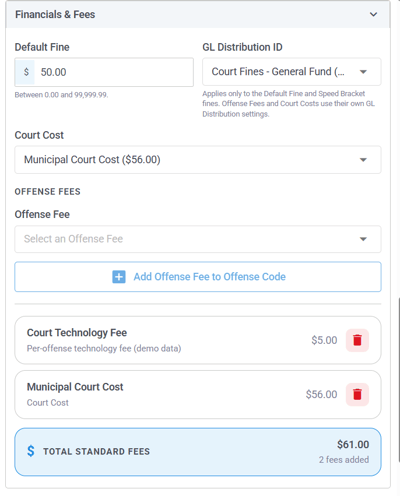
- Under Financials & Fees:
- Enter the Default Fine and pick its GL Distribution ID. This GL distribution is only for the fine. Court costs and offense fees use their own.
- Pick the Court Cost.
- To add an offense fee, pick it under Offense Fee and click Add Offense Fee to Offense Code. Repeat for each fee.
- Total Standard Fees shows the court cost and offense fees added together.
- Optional: add Custom Data Fields for any extra details you want to record on this offense.
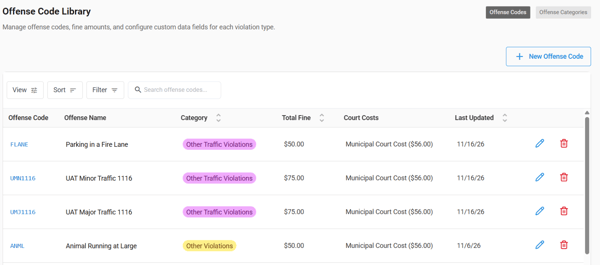
- Click Save. The offense code shows in the Offense Code Library.
What you'll see
- When a ticket becomes a case, the case gets each offense's fine plus the court costs and offense fees set up here.
- When a clerk takes a payment, it pays off the balance in your payment order. Each part posts to its own GL distribution.
- In Finance Hub, Court receipts arrive with the bank and GL accounts from these distributions.
Good to know
- A fee's GL distribution is locked onto each charge when the charge is added. Changing the fee's GL distribution later only affects new charges.
- A fee is only charged if it has an amount that's effective on its assessment date. Otherwise the clerk sees "No fee amount is effective as of [date]". Add the new amount record before the effective date.
- Payment order changes only apply to future payments. Payments already taken don't change. Posting a bond is never split by the payment order.
- In Kansas, offense categories are set by the state and can't be added, edited, or deleted. You can see them under Offense Library > Offense Categories.
- The Total Fine column in the Offense Code Library shows the default fine only, not the court costs and fees.
- Action fees are charged through action codes, for example the FTA action charging the Failure to Appear Fee. That's covered in the action codes article.
See also
- How to set up your court: profile, judges, agencies, officers, and attorneys
- How to set up action codes, document templates, and dockets
- How to take a payment on a court case
- How to close out the court day and process receipts in Finance Hub